[python] snscrape를 이용한 웹크롤링 및 데이터 시각화
[python] snscrape를 이용한 웹크롤링 및 데이터 시각화
📋 [ python ] 시리즈 몰아보기 (3)
📌 [python] snscrape를 이용한 웹크롤링 및 데이터 시각화
🚗현대인을 위한 3줄요약.
snscrape,wordCloud모듈을 사용하여특정 키워드가 본문에 포함된 트윗을 크롤링, 핵심 키워드와함께 언급된 관련 단어들을 분석, 해당 단어의 언급 빈도수에 따라시각화된 자료를 생성하는 프로그램을 작성했다.
-
사용된 모듈
| 1 | # 데이터 처리 모듈 |
| 2 | import pandas as pd |
| 3 | |
| 4 | # 웹크롤링 관련모듈 |
| 5 | import snscrape.modules.twitter as sntwitter |
| 6 | import itertools |
| 7 | from nltk.corpus import stopwords |
| 8 | from nltk.tokenize import word_tokenize |
| 9 | import re |
| 10 | |
| 11 | # wordCloud 모듈 |
| 12 | from wordcloud import WordCloud |
| 13 | import matplotlib.pyplot as plt |
👉 트윗 긁어오기
트윗을 긁어오기 위한 query 작성에는 다음과 같은 속성이 필요하다.
- 검색할 키워드,
- 검색할 날짜 범위
각각 search_word, start_day, end_day에 저장한 후 쿼리를 작성한다.
| 1 | #검색하고 싶은 단어 |
| 2 | search_word = "안녕" |
| 3 | |
| 4 | #검색하는 기간 |
| 5 | start_day = "2022-10-01" |
| 6 | end_day = "2022-10-14" |
| 7 | |
| 8 | search_query = search_word + ' since:' + start_day + ' until:' + end_day |
이후 작성한 query문을 scraped모듈을 통해 처리해준다.
sliced_scrapped_tweets의 파라미터로 트윗을 긁어올 명령과 긁어올 트윗의 개수를 전달한다.
| 1 | #지정한 기간에서 검색하고 싶은 단어를 포함한 tweet를 취득 |
| 2 | scraped_tweets = sntwitter.TwitterSearchScraper(search_query).get_items() |
| 3 | #처음부터 1000개의 tweets를 취득 |
| 4 | sliced_scraped_tweets = itertools.islice(scraped_tweets, 1000) |
👉 데이터 전처리 & 정리
이제 긁어온 데이터를 사용하기 쉽게 정돈할 차례이다. pandas DataFrame 모듈을 이용해 긁어온 데이터를 pandas 형식으로 정리한다.
그리고 해쉬태그/닉네임이 아닌 본문에 단어가 등록된 경우만을 위해 트윗의 content 라벨에 포함되어 있어야만 긁어오도록 하였다.
| 1 | #pandas DataFrame으로 변환 |
| 2 | df = pd.DataFrame(sliced_scraped_tweets) |
| 3 | df = df[df['content'].str.contains('안녕|하이|반가워|안녕하세요')] |
또한 트윗을 긁어올 때 필요없는 데이터는 미리 제거하기 위해 stop_words. 즉 불용어를 설정했다.
영어의 경우 기본적인 불용어들이 제공되지만 한글은 그렇지 않으므로 본인이 직접 지정해줘야 한다.
| 1 | stop_words = " ~~~한글 불용어들~~~ " |
| 2 | stop_words=stop_words.split(' ') |
불용어 지정이 끝났다면 실제로 트윗에서 불용어들을 삭제해주는 함수를 작성할 차례이다.
| 1 | # 트위터분석을 위한 기본적인 텍스트 cleaning 함수 |
| 2 | def CleanText(readData, Num=True, Eng=True): |
| 3 | # Remove Retweets |
| 4 | text = re.sub('RT @[\w_]+: ', '', readData) |
| 5 | # Remove Mentions |
| 6 | text = re.sub('@[\w_]+', '', text) |
| 7 | # Remove or Replace URL |
| 8 | text = re.sub(r"http[s]?://(?:[a-zA-Z]|[0-9]|[$-_@.&+]|[!*\(\),]|(?:%[0-9a-fA-F][0-9a-fA-F]))+", ' ', |
| 9 | text) # http로 시작되는 url |
| 10 | text = re.sub(r"[-a-zA-Z0-9@:%._\+~#=]{1,256}\.[a-zA-Z0-9()]{2,6}\b([-a-zA-Z0-9()@:%_\+.~#?&//=]*)", ' ', |
| 11 | text) # http로 시작되지 않는 url |
| 12 | # Remove only hashtag simbol "#" because hashtag contains huge information |
| 13 | text = re.sub(r'#', ' ', text) |
| 14 | # Remove Garbage Words (ex. <, >, etc) |
| 15 | text = re.sub('[&]+[a-z]+', ' ', text) |
| 16 | # Remove Special Characters |
| 17 | text = re.sub('[^0-9a-zA-Zㄱ-ㅎ가-힣]', ' ', text) |
| 18 | # Remove 출처 by yamada |
| 19 | text = re.sub(r"(출처.*)", ' ', text) |
| 20 | # Remove newline |
| 21 | text = text.replace('', ' ') |
| 22 | |
| 23 | if Num is True: |
| 24 | # Remove Numbers |
| 25 | text = re.sub(r'\d+', ' ', text) |
| 26 | |
| 27 | if Eng is True: |
| 28 | # Remove English |
| 29 | text = re.sub('[a-zA-Z]', ' ', text) |
| 30 | |
| 31 | # Remove multi spacing & Reform sentence |
| 32 | text = ' '.join(text.split()) |
| 33 | |
| 34 | return text |
보면 알겠지만 온갖 정규표현식으로 짬뽕이 되 무척이나 알아보기 힘들다. 대충 다음과 같은 역할을 한다고 알고만 있으면 되겠다.
리트윗,멘션삭제해쉬태그,URL삭제쓰레기값,특수문자삭제줄바꿈,출처삭제
또한 파라미터로 전달받은 Num, Eng이 True라면 해당하는 값(숫자, 알파벳)을 삭제해준다.
| 1 | for tweet in df.content: |
| 2 | cleaned_tweet = [] |
| 3 | # 한글 불용어 처리를 위해 Eng에 False값을 준다 |
| 4 | cleaned_tweet_string = CleanText(tweet, Num=True, Eng=False) |
| 5 | tweet_tokens = word_tokenize(cleaned_tweet_string) |
| 6 | for token in tweet_tokens: |
| 7 | if token.lower() not in stop_words: |
| 8 | cleaned_tweet.append(token) |
| 9 | |
| 10 | cleaned_tweets_all.append(cleaned_tweet) |
마지막으로 트윗 하나하나를 다 불러와 불용어 제거 함수에 대입해준 후 시각화 자료 생성을 위해 한줄의 string으로 만들어 준다.
한글 단어를 분석할 예정이니 Num은 True, Eng은 False를 전달해준다.
이러한 과정들을 통틀어 전처리 과정이라고 한다.
👉 데이터 시각화
데이터 시각화란 JSON, pandas와 같이 한눈에 파악하기 힘든 형태의 데이터를 한눈에 알아보기 쉽게 가공하는 것을 뜻한다.
다양한 방법이 있지만 이번에는 wordCloud 모듈을 사용해 시각화 자료를 생성해보도록 하자.
| 1 | all_words = [] |
| 2 | for cleaned_tweet in cleaned_tweets_all: |
| 3 | for word in cleaned_tweet: |
| 4 | all_words.append(word) |
| 5 | |
| 6 | all_words_str = ' '.join(all_words) |
wordCloud를 사용하기 위해서는 한줄로 묶은 데이터를에 띄워쓰기를 추가해 다시 가공해주어야 한다.
띄워쓰기가 있어야 모듈이 단어를 구분하기 때문이다.
| 1 | def generate_wordcloud(text): |
| 2 | wordcloud = WordCloud( |
| 3 | width=800, height=400, |
| 4 | relative_scaling = 1.0, |
| 5 | # 로컬환경에서 실행시 폰트를 지정해줘야 한다 |
| 6 | font_path='malgun', |
| 7 | # 마찬가지로 제거하고 싶은 단어를 여기에 추가 입력 |
| 8 | stopwords = {'to', 'of'} |
| 9 | ).generate(text) |
이후 시각화 자료를 생성하는 함수를 작성한다. WordCloud의 속성값에 이미지의 특성값을 전달해준다.
이때 한글 데이터를 출력하기 위해선 반드시 폰트지정을 해주어야 한다.
로컬환경에서 구동시 본인 pc의 Font 폴더에 있는 한글 폰트의 이름을 지정해주면 된다. 따로 폴더의 주소가 필요하진 않다.
| 1 | fig = plt.figure(1, figsize=(8, 4)) |
| 2 | plt.axis('off') |
| 3 | plt.imshow(wordcloud) |
| 4 | plt.axis("off") |
| 5 | plt.show() |
이후 모듈을 실행할 코드를 작성하면 된다. 위와 같이 코드를 작성하면 실행 즉시 사진이 출력된다.
| 1 | cloud.to_file('파일명') |
파일의 형태로 저장하고 싶다면 해당 코드를 삽입하면 된다.
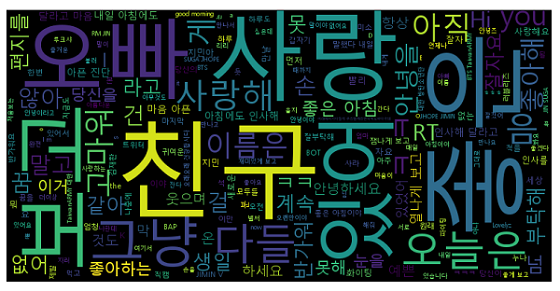
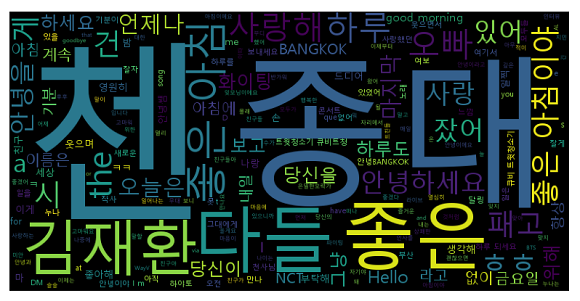
👉 결과화면
2018년 10. 01 ~ 10. 14

2022년 10. 01 ~ 10. 14

👉 전체코드
| 1 | import pandas as pd |
| 2 | import snscrape.modules.twitter as sntwitter |
| 3 | import itertools |
| 4 | from nltk.corpus import stopwords |
| 5 | from nltk.tokenize import word_tokenize |
| 6 | import re |
| 7 | |
| 8 | # wordCloud 모듈 |
| 9 | from wordcloud import WordCloud |
| 10 | import matplotlib.pyplot as plt |
| 11 | |
| 12 | #================================================================= |
| 13 | |
| 14 | # reference : Dr. 야마다 아키히코 |
| 15 | # https://colab.research.google.com/drive/14D9Zu4RN_fGABf-VRGooneIdsW16QqxP?hl=ko#scrollTo=8qfKxmWS2TCL |
| 16 | |
| 17 | #================================================================= |
| 18 | |
| 19 | # 트위터분석을 위한 기본적인 텍스트 cleaning 함수 |
| 20 | def CleanText(readData, Num=True, Eng=True): |
| 21 | # Remove Retweets |
| 22 | text = re.sub('RT @[\w_]+: ', '', readData) |
| 23 | # Remove Mentions |
| 24 | text = re.sub('@[\w_]+', '', text) |
| 25 | # Remove or Replace URL |
| 26 | text = re.sub(r"http[s]?://(?:[a-zA-Z]|[0-9]|[$-_@.&+]|[!*\(\),]|(?:%[0-9a-fA-F][0-9a-fA-F]))+", ' ', |
| 27 | text) # http로 시작되는 url |
| 28 | text = re.sub(r"[-a-zA-Z0-9@:%._\+~#=]{1,256}\.[a-zA-Z0-9()]{2,6}\b([-a-zA-Z0-9()@:%_\+.~#?&//=]*)", ' ', |
| 29 | text) # http로 시작되지 않는 url |
| 30 | # Remove only hashtag simbol "#" because hashtag contains huge information |
| 31 | text = re.sub(r'#', ' ', text) |
| 32 | # Remove Garbage Words (ex. <, >, etc) |
| 33 | text = re.sub('[&]+[a-z]+', ' ', text) |
| 34 | # Remove Special Characters |
| 35 | text = re.sub('[^0-9a-zA-Zㄱ-ㅎ가-힣]', ' ', text) |
| 36 | # Remove 출처 by yamada |
| 37 | text = re.sub(r"(출처.*)", ' ', text) |
| 38 | # Remove newline |
| 39 | text = text.replace('', ' ') |
| 40 | |
| 41 | if Num is True: |
| 42 | # Remove Numbers |
| 43 | text = re.sub(r'\d+', ' ', text) |
| 44 | |
| 45 | if Eng is True: |
| 46 | # Remove English |
| 47 | text = re.sub('[a-zA-Z]', ' ', text) |
| 48 | |
| 49 | # Remove multi spacing & Reform sentence |
| 50 | text = ' '.join(text.split()) |
| 51 | |
| 52 | return text |
| 53 | |
| 54 | #================================================================= |
| 55 | |
| 56 | |
| 57 | #검색하고 싶은 단어 |
| 58 | search_word = "안녕" |
| 59 | |
| 60 | #검색하는 기간 |
| 61 | start_day = "2022-10-01" |
| 62 | end_day = "2022-10-14" |
| 63 | |
| 64 | search_query = search_word + ' since:' + start_day + ' until:' + end_day |
| 65 | |
| 66 | #지정한 기간에서 검색하고 싶은 단어를 포함한 tweet를 취득 |
| 67 | scraped_tweets = sntwitter.TwitterSearchScraper(search_query).get_items() |
| 68 | |
| 69 | #처음부터 1000개의 tweets를 취득 |
| 70 | sliced_scraped_tweets = itertools.islice(scraped_tweets, 1000) |
| 71 | |
| 72 | #pandas DataFrame으로 변환 |
| 73 | df = pd.DataFrame(sliced_scraped_tweets) |
| 74 | df = df[df['content'].str.contains('안녕|하이|반가워|안녕하세요')] |
| 75 | |
| 76 | stop_words = " ~~~한글 불용어~~~" |
| 77 | stop_words=stop_words.split(' ') |
| 78 | |
| 79 | # tweet 하나하나 불러오고 stopwords 제거 |
| 80 | cleaned_tweets_all = [] |
| 81 | |
| 82 | for tweet in df.content: |
| 83 | cleaned_tweet = [] |
| 84 | # 한글 불용어 처리를 위해 Eng에 False값을 준다 |
| 85 | cleaned_tweet_string = CleanText(tweet, Num=True, Eng=False) |
| 86 | tweet_tokens = word_tokenize(cleaned_tweet_string) |
| 87 | for token in tweet_tokens: |
| 88 | if token.lower() not in stop_words: |
| 89 | cleaned_tweet.append(token) |
| 90 | |
| 91 | cleaned_tweets_all.append(cleaned_tweet) |
| 92 | |
| 93 | # print(cleaned_tweet) |
| 94 | |
| 95 | |
| 96 | #=============================================================== |
| 97 | |
| 98 | # wordCloud 생성 |
| 99 | def generate_wordcloud(text): |
| 100 | wordcloud = WordCloud( |
| 101 | width=800, height=400, |
| 102 | relative_scaling = 1.0, |
| 103 | font_path='malgun', # coLab이 아닌 로컬환경에서 실행시 폰트를 지정해줘야 한다 |
| 104 | stopwords = {'to', 'of'} #제거하고 싶은 단어를 여기에 입력 |
| 105 | ).generate(text) |
| 106 | |
| 107 | fig = plt.figure(1, figsize=(8, 4)) |
| 108 | plt.axis('off') |
| 109 | plt.imshow(wordcloud) |
| 110 | plt.axis("off") |
| 111 | plt.show() |
| 112 | |
| 113 | all_words = [] |
| 114 | for cleaned_tweet in cleaned_tweets_all: |
| 115 | for word in cleaned_tweet: |
| 116 | all_words.append(word) |
| 117 | |
| 118 | all_words_str = ' '.join(all_words) |
| 119 | |
| 120 | generate_wordcloud(all_words_str) |
Reference By....

💡 로그인 하지 않아도 댓글을 등록할 수 있습니다!